How to Create a Company in Tally ERP9?
To begin with accounting in Tally, it is essential to learn how to create a company. In Tally ERP 9, multiple companies can be created, catering to diverse business needs. This feature allows users to manage and organize their financial data efficiently.
Table of Contents
Key Benefits of Creating a Company in Tally
- Enables organized financial management
- Allows for the creation of multiple companies, suitable for diverse business requirements
- Facilitates efficient accounting and data management
By understanding how to create a company in Tally, users can unlock the full potential of the software and streamline their accounting processes.
Read More: 72 Tally ERP 9 Shortcut Keys
Creating a Company in Tally ERP 9: A Step-by-Step Process
To create a company in Tally ERP 9, follow these simple and straightforward steps:
- Launch Tally ERP 9: Click on the Tally ERP 9 icon to initiate the application.
- Access the Gateway of Tally: Upon launching, navigate to the Gateway of Tally, which serves as the main hub for various Tally functions.
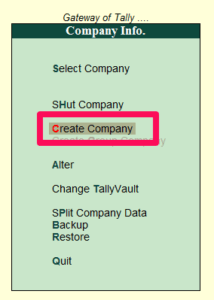
- Select Company Info: From the Gateway of Tally, click on Company Info to access company-related settings and configurations.
- Create a New Company: Within the Company Info section, click on Create Company to start the process of setting up a new company in Tally ERP 9.
By following these easy-to-follow steps, users can successfully create a company in Tally ERP 9 and begin managing their financial data efficiently.

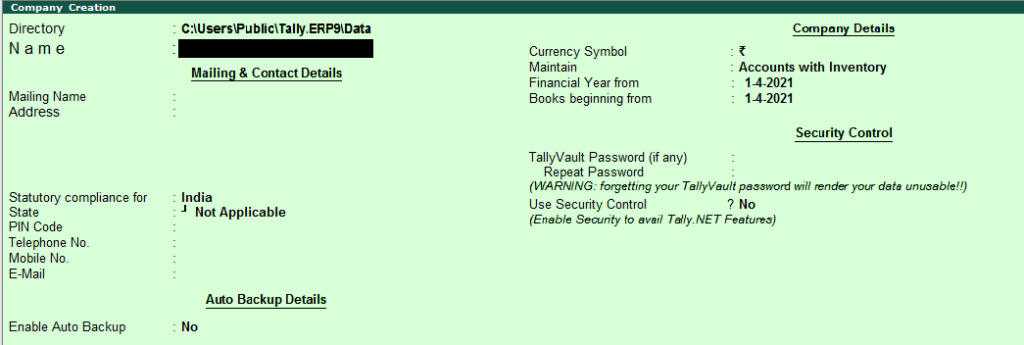
Company Creation
When creating a company in Tally ERP 9, it is necessary to provide essential details about the company. These details are categorized into sections, which are explained in depth below:
1. Directory
Here you need to select the data storage location.

2. Name of the Company in Tally
Enter the name of the company. The name of the company can be anything that will help you to identify in the Tally. For eg. XYZ Ltd. Ahmedabad
3. Mailing Details
- Enter a proper name of the company as this name will print on all ledgers and reports.
- Fill up the address of the company as this address will be printed on all reports and invoices.
- Enter the Currency Symbol in which you want to maintain the books of accounts of the Company.
- Select from the two options Account only, and Account with Inventory according to the service the company provides.
4. Books and Financial Year Details
Usually, the financial year begins on 1st April of every year. But few companies are incorporated other than 1st April. So fill up the beginning date of books accordingly.
5. Contact Details
Enter complete contact details of the company i.e. Mobile no., Landline no., Fax no., Email ID, Website Address, etc.
6. Security Vault
- Enter a password if you want to use the Tally Vault feature. Re-enter the password again in order to check that the password you entered was correct.
- Activating this option will avoid unauthorized access to company data.
Base Currency Information – Create a Company in Tally
The Base Currency section is located at the bottom of the Company Creation screen. This field specifies the currency symbol in which the company’s books of accounts will be maintained.
Key Points to Note:
- The base currency is usually filled automatically by the system, based on the country or region selected during company creation.
- However, users have the option to modify this field manually, if required, to accommodate specific business needs or currency preferences.
- It is essential to accurately select the base currency, as it will be used for all financial transactions and accounting purposes within Tally ERP 9.

1. Base Currency Symbol
The currency symbol of the country is selected automatically.
2. Formal Name
This is the field where the formal name of the currency is written
3. Suffix Symbol to amount
Here it will ask you whether you want to add a currency symbol prior to the amount. Simply choose Yes or No.
4. Add Space between amount and symbol
This field will ask you whether you want space between the currency symbol and amount. Simply choose Yes or No.
5. Show amount in millions
If you select Yes then it will display the amount in millions. Amount in the Balance sheet as well reports will be seen in millions if you select Yes for this field.
6. Number of decimal places
In general, people set it to 2 decimal places.
7. Word representing the amount after decimal
This field is used to set the formal name of the decimal value.
8. Number of decimal places for amounts in words
This field is set similar to a number of decimal places.
After you have entered all the above details correctly you press Enter and again Press Enter to save all the details.
The Company is created easily in Tally ERP9
READ NEXT:


